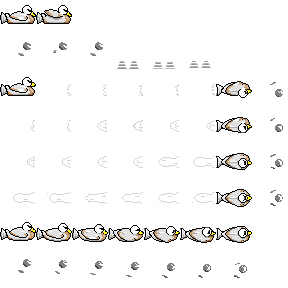
Sitting Duck will be a bullet hell, so it’s pretty important that everyone can see the bullets.
I didn’t have a set color scheme when initially designing the first set of ships in Sitting Duck. If anything, I was going to match the markings of a real duck on the Mallard-01 and just make the enemies the opposing color.
Then Mark Brown put out his video on colorblind options.(Watch it here) I hadn’t done much on the art front so I thought, “Hey, I can do that. How hard can it be?” Famous last words.
The Sprites

Knowing I was going to do this; I started on the sprites with a few key design rules.
- Physical, game-related ships and objects will have a black sprite outline and BG objects will have no outlines.
- Color sections have to be done in 25%, 50%, and 75% grey instead of the intended color.
- The palette for the non-colored sections of the ships have to be neutral browns, greys, and rarely black/white.
This also means that I have 33% more layers in my animations. Each frame of animation I draw has three layers: linework, changeable colors, and unchanging colors.
Of course, my sprite sheets are also 100% larger. In order to cut everything nicely, I have to give the soon-to-be colored detail the same amount of space as the rest of the sprite. Luckily, I found this sweet little photoshop plugin or I would (still) be creating these manually.
So it’s a lot of setup work for each ship before it gets into Unity. But what about when we get it there?
The Shader
This was a painful learning experience. I needed a shader that worked similarly to the overlay layer mode in Photoshop. Unity has some basic color adjustments on sprites and materials but the result is more akin to looking at the image through a colored film.
It took some googling but I finally managed to “understand” and cobble together the shader. The important part (as I understand it) looks like this:
sampler2D _MainTex; //The sprite/texture we reference.
fixed4 _OverlayColor; //The color to overlay
fixed4 frag (v2f i) : SV_Target
    {
     fixed4 mainTex = tex2D(_MainTex, i.uv); //per pixel reference
     fixed4 oc = _OverlayColor; //storing _OverlayColor as a Vector4.
     mainTex = i.color;  //The original color of that pixel.
     fixed4 overlay; //The Vector4 that holds the result.
     //These long equations are effectively greater than/less than checks on the mainTex value. Only at 50% grey is the _OverlayColor unchanged.
     overlay.r = (step(0.5f, mainTex.r)(1-(1-2(mainTex.r-0.5))(1-oc.r))) + (step(mainTex.r, 0.5f)(2mainTex.r)oc.r);

     overlay.g = (step(0.5f, mainTex.g)(1-(1-2(mainTex.g-0.5))(1-oc.g))) + (step(mainTex.g, 0.5f)(2mainTex.g)oc.g);

     overlay.b = (step(0.5f, mainTex.b)(1-(1-2(mainTex.b-0.5))(1-oc.b))) + (step(mainTex.b, 0.5f)(2mainTex.b)*oc.b);

     overlay.a = mainTex.a; //Alpha is the same as original.
     return overlay; //Return and display the calculated color.
     }
The end result takes an OverlayColor as an input and intelligently multiplies its RGB values to the sprite’s color values. If the OverlayColor is a 50% grey, the end result will look exactly like the sprite sheet. I only half understand what I did here. Controlling it was “easier”.
The Scripts
Part of the learning curve for devving this game is figuring out which scripts hold which settings. I figured that the colors I was setting were settings and not directly related to the game state. So they went on the SettingsManager instead of the GameManager.
public class SettingsManagerScript : MonoBehaviour {
 public Color AllyColor = Color.green;
 public Color AllyWeapColor = Color.cyan;
 public Color EnemyColor = Color.red;
public Color EnemyWeapColor = Color.magenta;
But then the SettingsManager lives in the ManagerScene and the game sprites live in level scenes (for scene loading and management). The SettingsManager can’t reference those objects. So it was time to build a color changing script.
I initially set the reference to the SettingsManager and its colors manually on each of the scene objects. This was fine for testing but wouldn’t scale. The SpriteColorChangeScript does everything in a generic way so I can reuse it on any future objects. It’s also in C# instead of FlowScript so it runs faster.
public class SpriteColorChangeScript : MonoBehaviour {
//Reference to the SettingsManager
private SettingsManagerScript settingsManager;
public enum friendOrFoeEnum {FRIEND, FOE}; //A dropdown selection of ship/weapon type.
public friendOrFoeEnum objectType;

//Manually filled lists of which sprites are affected by the color change.
//Image lists are for coloring the UI.
public SpriteRenderer[] detailSprites;
public SpriteRenderer[] energySprites;
public Image[] uiDetail;
public Image[] uiEnergy;

// Use this for initialization

void OnEnable ()
//Find the SettingsManager.
{
    settingsManager = FindObjectOfType ();
    if (settingsManager == null) {
        Debug.Log ("Could not find a SettingsManager.");
        return;
    }
//Call color change function based on type.
    if (objectType == friendOrFoeEnum.FRIEND) {
        ChangeColorsFriend ();
    }

    if (objectType == friendOrFoeEnum.FOE) {
        ChangeColorsFoe ();
    }
    TestSeconds ();
}

//A public function for menus to call. This lets the player change color settings in the pause menu.
public void ChangeColors ()
{
    if (objectType == friendOrFoeEnum.FRIEND) {
        ChangeColorsFriend ();
    }

    if (objectType == friendOrFoeEnum.FOE) {
        ChangeColorsFoe ();
    }
}
That’s the boring setup parts. The important bit looks like this:
void ChangeColorsFriend ()
{
//Check length of Sprite list and run if has members.
    if (detailSprites.Length > 0) {
        int dArrayLength = detailSprites.Length;
        for (int i = 0; i < dArrayLength; i++) {
//If the sprite is using the Default shader, change the Sprite's color to match AllyColor in settingsManager.
            if (detailSprites[i].material.shader.name == "Sprites/Default"){
                detailSprites [i].color = settingsManager.AllyColor;
            }

//If the sprite is using the SpriteColorOverlay shader (important and most of them),
we can't directly change the material color.
//Instead we have to create what is known as a PropertyBlock to hold the values of the instance.
//We can then change the values on the PropertyBlock and apply it back onto our object.

            if (detailSprites [i].material.shader.name == "Custom/SpriteColorOverlay") {
                MaterialPropertyBlock spritePropBlock = new MaterialPropertyBlock ();
                detailSprites [i].GetPropertyBlock (spritePropBlock);
                spritePropBlock.SetColor ("_OverlayColor", settingsManager.AllyColor);
                detailSprites [i].SetPropertyBlock (spritePropBlock);

            }
//Log if a sprite can't have its color changed.
            else {
                Debug.Log (detailSprites [i].name + " does not have a compatible shader.");
            }
        }
    }
//The same thing but for UI elements. Main difference is images starts from pure white instead of 50% grey.
   if (uiDetail.Length > 0) {
        int uidLength = uiDetail.Length;
        for (int i = 0; i < uidLength; i++) {
            uiDetail [i].color = settingsManager.AllyColor;
        }
    }
}
Cool. So now my ships and things can find and change their color when they load in. All that's left is to plug in the UI.
The UI
Buttons are nice in Unity. They have built in scripting for simple things but can also be extended for the rest. I started with buttons for each type of color.

These bring up the color picker menu. For now, I'm thinking that the ships and energy will be curated colors. This way I can semi-control the look and feel of the game while still allowing useful options. These colors aren't final but I am leaning towards green/cyan for the good guys and red/magenta for the bad guys.
Now, one variable type that buttons parse by default is a color. So I just needed to make a small button specific script to listen for it:
void Start () {
		thisButton = this.GetComponent pretendthissaysButton ();
//The important bit. Triggers ColorPass when the button is clicked.
		thisButton.onClick.AddListener (ColorPass);
	}
//Tells the SettingsManager to set colors based on the type and color.
	void ColorPass()
	{
		if (targetObject == TargetObjectEnum.ALLY)
		{
			settingsManager.SetAllyColor (newColor);
		}
		else if (targetObject == TargetObjectEnum.ALLYWEAP)
		{
			settingsManager.SetAllyWeapColor (newColor);
		}
		else if (targetObject == TargetObjectEnum.ENEMEY)
		{
			settingsManager.SetEnemyColor (newColor);
		}
		else {
			settingsManager.SetEnemyWeapColor (newColor);
		}
	}
And bamph! Wait. what are these buttons calling on SettingsManager?
public void SetAllyColor (Color newColor)
	{
		AllyColor = newColor;
		ChangeAllColors ();
	}
void ChangeAllColors ()
	{
		var coloredObjects = FindObjectsOfType ();
		//Debug.Log(coloredObjects + " : " + coloredObjects.Length);
		foreach (var item in coloredObjects) {
			item.ChangeColors ();
		}
	}
So... yeah. I can't control which items are on screen and I'm going to be dynamically loading a whole host of things during gameplay. So SettingsManager is set to find all of the currently loaded ColorChangeScripts in the scene to tell them to swap colors.
I'm aware that this could be suicide if done while a level is running. Luckily, this can only be triggered in the main menu or when the game is paused. Hopefully, this never gets so heavy that you'll notice in those circumstances. I'm currently willing to take the risk.
The Crosshair
My half-colorblind brother made a suggestion as I was working: Change the crosshair color. My default bright red color is really easy to see for me. But it could get really hard to distinguish against some green backgrounds if you're colorblind. As it's possibly the most important part of the game UI, I have opted to play with full RGB control here.
I was feeling the settings manager was getting a little crowded so I set up a seperate script just for the cursors. Plural as I might want to add an enemy cursor later and we also need to have the cursor color preview in the menu.
On the cursor color script, I set up three simple float functions.
public void SetR (float rvalue) {crosshairColor.r = rvalue;}
public void SetG (float gvalue) {crosshairColor.g = gvalue;}
public void SetB (float bvalue) {crosshairColor.b = bvalue;}

public void AppplyColor() {
if (gameCrosshair != null)
  {
  gameCrosshair.color = crosshairColor;
  }
  foreach (var item in crosshairsUI) {
  item.color = crosshairColor;
  }
}
These play nicely with the Unity UI sliders (set to 0-1). Once the color value is set, The script just needs to run through all of the sprites and images and change their color.

And after adding a couple reset buttons and such, I'm done! While it's a little butts at just how much work the sprites are going to take, this should let everyone play without running into an invisible bullet.
Until next time: Quack.


